


Glass is beautiful — the shine, the shape, and the transparency can all make a simple object feel more like a work of art. But photographing glass is difficult for all of those reasons. The shine quickly ruins a photograph, creating hot spots of light or worse, reflecting your studio within the glass itself. And because glass is transparent, it's tough to get a piece of glass to stand out from its background to really emphasize that shape.
That's exactly what I discovered when I shot my first product line, which happened to include a clear liquid in a clear bottle. As primarily a portrait and event photographer, I don't come across glass or transparent objects very often. With a bit of experimentation, I found a set-up that worked okay for my subject:

But, my spontaneous experimenting got me thinking — what's the best method for glass photography? So, I set out to find a tried-and-true method for photographing glass and other transparent objects. What did I find? Successfully photographing glass is all about light and reflections — you have to control both for a great shot.
Step 1: Control the Light.
When I set up my product shoot, I ended up backlighting the clear bottle for rather silly reasons: I wanted to overexpose my white backdrop so I didn't have to spend an hour ironing out all the fine creases. But backlighting is the best way to light a transparent, reflective object like glass.
Front and side lighting will create “hot spots” of light and reflect the surroundings, but backlight will eliminate reflections and help define the edges.
When backlighting glass, however, another issue arises: how do you hide the light? When setting up a portrait, it's easy to hide the hair light behind the subject. With a transparent object, that's a bit tougher to do.
The simplest solution is to use the background as the light source itself. Placing a light off to the side or underneath the table but directed at a white reflector (or even just a white backdrop) bounces light back through the glass, resulting in a soft backlight. If you don't want a white background, you can use gels to change the color of the light that's being reflected.
A large softbox can be used as the background to achieve a similar effect. With a large softbox as the background, you'll get the same backlighting, but you won't get a gradation effect from the light being more intense in one section of the reflector. A light tent designed for product photography will also work well to get a backlighting effect.
If you want to achieve a "true white" background, try using a lightbox. You can read in detail on it in Harold Davis' post on photographing flowers for transparency.

To get this shot, I set up in my daughter's bedroom, since blackout curtains meant I could completely control the light. Notice how in this shot, there aren't any reflections or hot spots, but you can clearly see the edges of the glass.
I used a reflector as a backdrop with the light just under the table and slightly to the right, directed towards the reflector.
Step 2: Control the Reflections.
There's one problem with the shot above—if you look closely at the cake stand, you can see a green tint in the center and along some of the decorative circles:
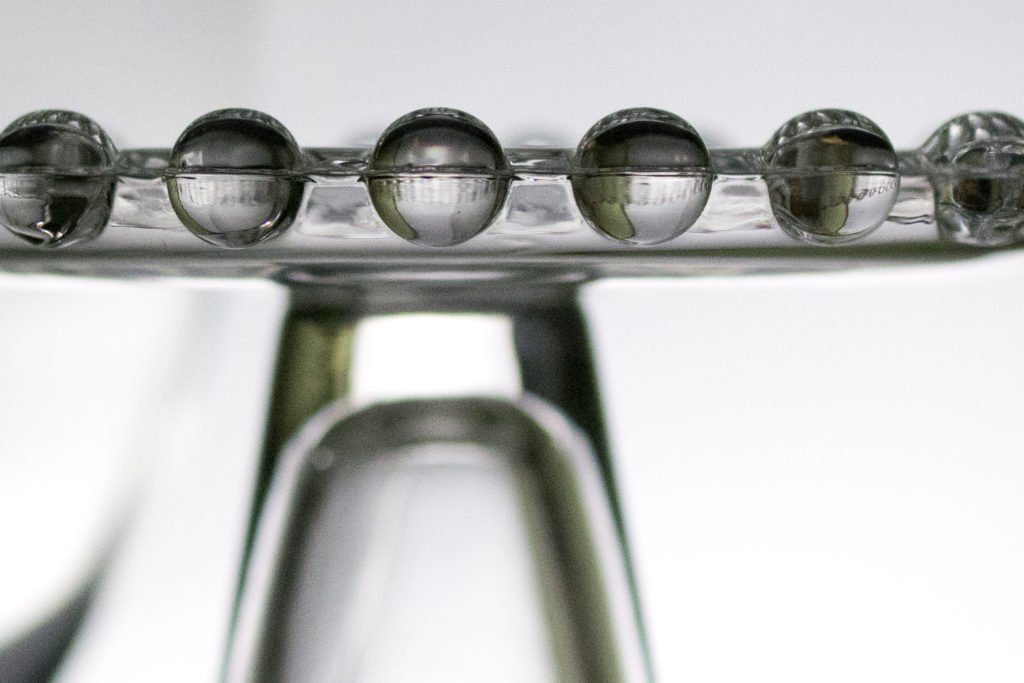
Guess what color the walls were in the room I shot the photo in? Yes, green. Glass is highly reflective, and even though the backlighting prevents you from actually being able to make out the objects in the room, the colors in the room can still be reflected in the edges.
By controlling the color that's reflected in the room, you can control the color of those edges. And no — you don't have to paint an entire room to change the colored reflections.
For my shot, I place a reflective piece of the acrylic display board (try this one AbleDIY Black & White Acrylic Display) over a black backdrop. To eliminate the green tint, I brought the edges of the backdrop up on the sides, but out of the frame. Essentially, I created small black backdrops on each side of the shot to eliminate the green hue.
I'm all about taking great photographs with minimal investment (just like these guys) —instead of dragging out backdrop stands, I put laundry baskets under the backdrop (real classy, huh?).
If you don't have a black backdrop, you can use black foam board on the sides of the shot — you can usually pick up a sheet for under $5.

Using black on the edges works well because it creates more definition. But, you could apply the same concept to add a color tint to the edges of your glass. Or, for less defined edges, use white on the sides to block the color of the room from reflecting in your shot — this is similar to the effect that you'll get from shooting inside a light tent.
Step 3 in Glass Photography: Shoot and process.
Setting up the light and controlling the reflections are the toughest parts of photographing glass. Once you get those two down, you're ready to take a glass photo. With the backlighting and white backdrop, you will likely need to overexpose from what the meter tells you — my shot, for example, was at +1.3 EV. I used an f/2.8 aperture to draw more attention to the cake stand.
Using Adobe Camera RAW, I adjusted the exposure and enhanced the blacks to bring out even more sharpness. (Thanks to some Windex and a rag beforehand, I didn't have imperfections to clone out).
Glass is one of the toughest things to photograph. Using a backlit set-up enhances the shape of the object while eliminating the hot spots associated with front and side lighting. Using “backdrops” on the side of the object will also help to eliminate color tinting. Even if you don't often come across glass photography (like me), experimenting with a few glass objects will expand your understanding of light in ways that you can apply to other areas of photography.
Post by Hillary K. Grigonis, a Michigan-based lifestyle photographer. When she’s not taking pictures, she’s writing (about taking pictures).


